Yes on this one . . .


Photos stolen from BaRon's blog and DICE Magazine.  This build is really neat - about everything about it - I like it a lot . . .


I like the front wheel, rear fender, frame molding, high shoulder rims, paint color, mural . . . it's just a bitchin' build.  I might shorten the sissy bar and lean it back a bit...and ditch the CV carburetor for an SU or Linkert...but, hey - it's not my bike - and I don't think it's for sale - and if it was, I probably couldn't afford it.  Hats off to one sweet ride. 

Harley WR Racing Engine

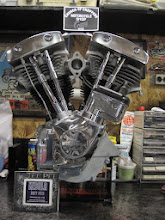
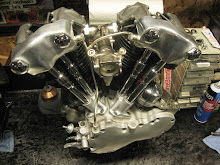
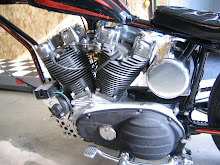
I've been jammin' the last few weeks to get this WR engine done so I can deliver it to
The Mama Tried Motorcycle Show on Feb. 15-16 in Milwaukee.  This particular engine has some documented race history with a top 5 finish in the early 1950s at the legendary Springfield Mile. 
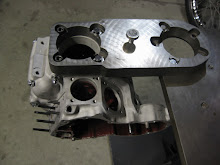
After repairing the engine cases, machining, measuring, etc.  Almost every part on the engine has required attention.  The motor was together when I received it, but the parts mirrored "swap meet specials" haphazardly assembled.  The ball bearing construction appears easy to conquer...but now you're dealing with hand-press-fit on everything.  It's very difficult to align the cam timing marks when each cam is pressed into position.  I ended up "adding the pinion gear last" since it's slip fit, and the wide mark on the spline is at the same position as the timing mark, so you knew your position.  So many particulars need addressed when assembling an engine of this nature.  Basically, it's got to be perfect, or destroy shit on initial start up.  This is the 5th ball bearing-type engine I've built (with dad too) - and we still spend about as much time reading, as we do building the motor.
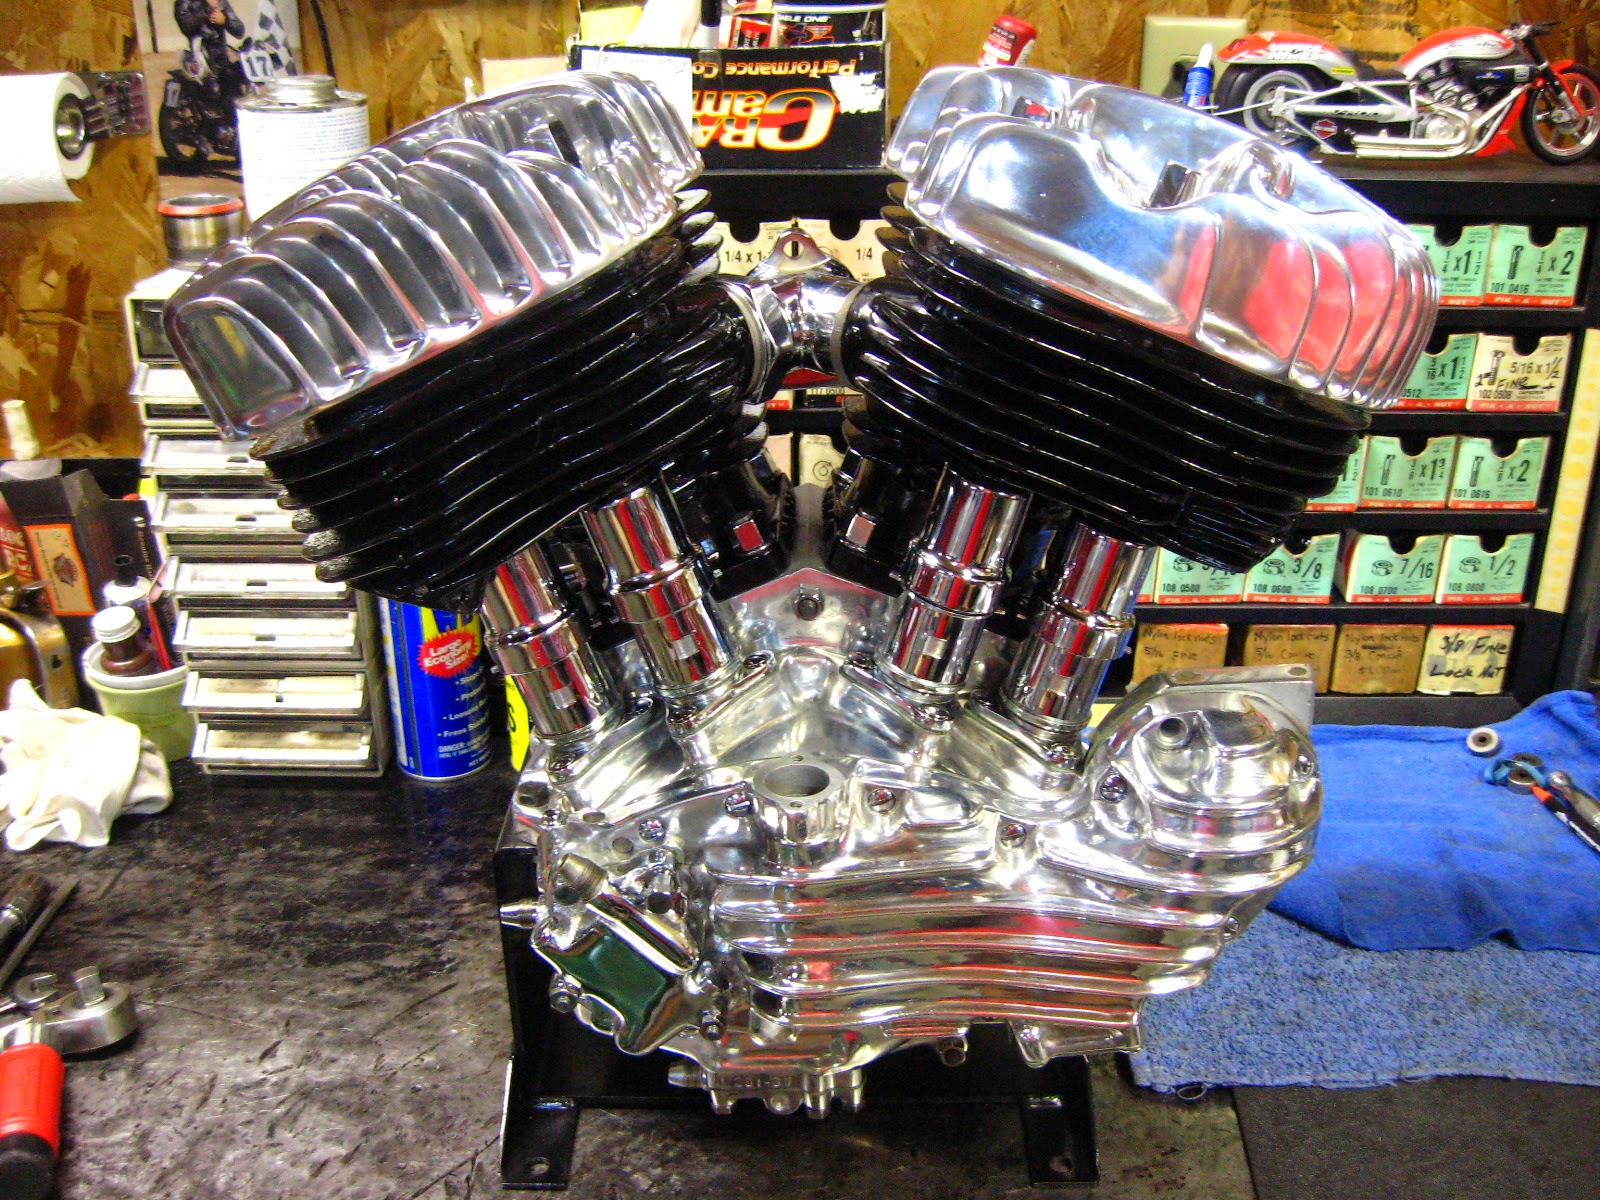
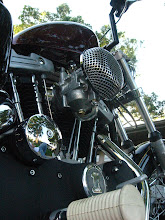
The magneto is a horizontally mounted Wico Single Fire type unit.  The ignition timing is best set by
location of the piston to TDC...then verify the timing actual timing mark on the flywheel.  On the earlier WRs, once the gear cover is on...you can't change your timing from the outside, since the magneto is bolted solid to the case.  No rotation.  The Wico cap has a #1 which indicates the REAR(or #1 cylinder) and the spark plug wires must be installed correctly. 
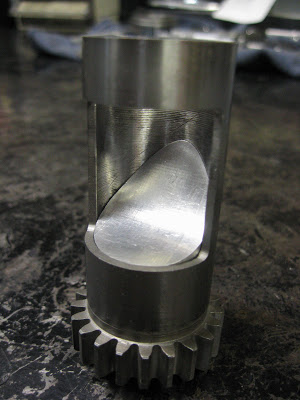
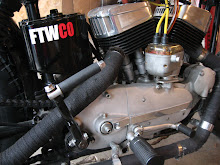
I updated the sprocket shaft seal (from the steel reverse thread seal) to a modern type rubber-lip seal.  It required indicating the oem steel outside spacer to dead on a lathe, then turning a recess for the seal (for press fitment)and cutting a snap ring groove. The seal kit (from Colony) is the same as a Big Twin seal, since the sprocket shaft in a WR is the same diameter as a panhead....but instead, runs a large 25mm ID high load ball bearing.  A #1205 ball bearing to be exact: 25mm x 52mm x 15mm Superblend-type bearing.  This type bearing compensates for crankshaft deflection.
The pinion side runs a #1204 Superblend type bearing. 
20mm x 47mm x 14mm
All bearings require light press fit on shafts and case. 
It's just fun times getting all this to fit the way it should...
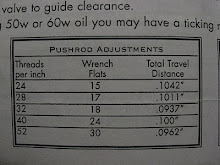
The lower pump has been checked over, blasted, washed and inspected.  I painted it my special cast iron gray, installed, with breather timed.  I bumped the breather ahead 1 tooth, since the piston was already about 2" down in the cylinder before it started opening (via breather timing mark).  By one tooth advanced, the breather window opens just after TDC - to get that crankcase evacuated of pressurized air a bit sooner.  The cylinders had "hardened steel sleeves" installed sometime over the years.  I had to purchase specific honing stones to straighten-out-the-tight-spots and generate a usable set of cylinders, since they are already oversized.  To win races back in the 1950s, these engine builders used the largest valves, and largest bore sizes, and bent the rules to take wins.  Unfortunately, the removal of all this metal leaves nothing behind for restoration.  New guides, a couple valves, new springs, all shimmed and set for cam specifications.  The cylinder/valve work on these flatheads is usually the most time consuming.  It seems simple, but these motors will run and run while still way-out-of-specification.  They're usually worn to epic levels.  These things just keep on chugging - all the way to the flag !

Top End History

The Harley 45"
Simplicity at it's finest, and most likely the longest running H-D design now and forever.  From the late 1930s all the way to 1973 - they're still one of the best designs to ever come out of Milwaukee.
The 74" and 80" Sidevalves
Take the tried and true and trusted reliability of the 45" and make it bigger !
The K Model and KH Model
Take the basic good points and mannerisms of the flathead, unitize the engine block with the transmission, and add a healthy dose of cams, racing style carburetion, pop-up pistons and smoothed ports . .  and hold on !
Let's go Overhead !
Since 1936 - it's been the King of the Road for the H-D line.  Highly sought by collectors and retro chopper fiends...The Knucklehead in all it's glory.
The Beauty Queen . . . The Panhead
Arguably the engine that put H-D on the map.  Reliability and beauty at the same time.  The subject of songs, movies and the dream to just have one in the garage with your name on the title (even if it runs or not)  I just don't know why they never made it an 80 incher.....
The Tough Guy !
The end result of all it's forefathers . . . The Shovelhead kept the company's (no pun intended) head afloat and lost credo to the Evo as the savior.  But, ask any die hard old-timer wrench-n-rider and they'd rather run their shovel than the Evo any day.
The Evolution
It's taken many years, but it's early respect has morphed into the historical respect it deserves.  The "rock" of the H-D engine line - It's finally becoming a collector in it's own right.  Long live the Evo and welcome to the club !
 

S&S Air Cleaner (again)

I can see it now....I'm gonna end up with an S&S air cleaner on everything.  I made up another "B" series backing plate to adapt to my "E" series carburetor.... and it just rips now !  All kinds of response, and it just runs better (than the Linkert style, 7" round style).  That round air cleaner didn't like wind or rain much either - but I've never had a problem with the S&S teardrop in those conditions.  Now just need some nice weather.  I'm still riding short runs, so I fulfilled my 2018 goal again of riding every month.

More Mert . . .

He looks tiny on this thing.  Not a real big guy anyway, just stocky and strong.  Looks like it's got aluminum rims?   Anyone know what sauce pan they used to make air-cleaners out of ???  A guy told me once, and I should have wrote it down. 

Mert Lawwill

Iron XR
 

Motorcycles Are Expensive

Every bike I've had pretty much started out like this.  A box of stuff, missing about everything.  Many of you have done the same thing . . . My first bike was wrecked with broken cases.  The next one was all apart, but mostly original H-D parts.  From there on out, they were all in piles, or missing about everything 'cept the vital pieces.  Above is the '54 Panhead.  You sure learn a lot when you do it this way.  Much more than a guy realizes . . . I could probably afford a complete bike now - but why start ?

This is turning into a K Model Blog . . .

I got a deep, dry basement.  It's got neat rustic walls.  I run a dehumidifier all summer so it stays dry.
There's not much down there but a few folding tables where I keep some parts for future builds.  I've sold all my parts (except for the K Model stuff, and a few spares).  I never really had all that much for parts anyway. 


TECH: KK Cylinders

I've had these awhile.  They were rusted, needed a bore job, a base was broken, and cooling fins were missing.  One has now been sleeved.  The fins repaired.  The base repaired.  They have new guides and new valves.  The rusty, pitted valve seats have been ground and lapped. 
That plastic bag has the Eastern Motorcycle Parts spring spacers I'll use to set up the valve springs for a set of KK cams I have collected.  These are nice spacers to use, since they have a small lip on top that fits into the valve spring and helps center it on the guide, and hold it in place.  I'll measure my installed spring height, then subtract my cam lift (and .070).  Then I'll subtract the length of my spring at coil bind.  This will leave me with the proper length to make my spacer/shim for that particular valve.  I used my Valve Spring Tester to check my springs, and I'll run the 2 strongest on the exhaust valves.

Leaky Manifold

When you crank this thing open, the motor gains revs, and likes to hold the revs, even after you back off the throttle.  A leaky manifold was the culprit.  I was having so much fun riding it around the track, and it's on-the-gas most of the time anyway - it didn't really bother me.  But it's a good way to burn a piston, or worse, wreck.  It's fixed now...but I see my Dellorto carb plastic float has a bit of gas sloshing around in it now too - so I ordered a new float. 
Like Marvin The Martian says, "Delays...Delays."

Plumber Intake

These original 1948 heads had been "upgraded" to o-ring style.  It wasn't a nice "upgrade" (if you get my drift?)  Kinda cobbled.  It took a little doin' .. . but we got the stock style plumber back in there, and used some sealer.  Then we drilled holes, and manufactured our own mild steel rivets with factory style heads (after viewing photos).  The rivets were press fitted, with sealer, and peened on the inside like stock.  I painted the rivets with cast-iron-gray high heat.

Cylinders Didn't Fit

It's always a good idea to mock up these motors before you get too carried away with assembling parts for good.  The cylinders didn't fit, requiring sanding, de-burring and plenty of aspirin and head scratching.  It's nice if the cylinders can move on the base studs a bit when aligning the intake manifold. 
This engine was abused by multiple owners over the years.  It has many burrs and dings...and requires checking all sorts of shit before you get too far along.  Parts that normally always fit, for some reason don't fit on this thing????  It's just time consuming - and can make a guy go crazy !

Polished Parts

I'm building a 1956 KHK for my buddy Dave.  I get boxes of parts in the mail from him.  Sometimes I open the box, and the parts are totally trashed, greasy, dented, rusted and broken.  Other times I open the box, and the parts are the most beautifully polished, original parts you've ever seen.  They are so pretty you hate to touch them, and you have to be ultra careful not to scratch anything.  This was one of the "shiny times" I opened the box.  Now cleaning, checking threads, pressing and sizing bushings. 

33430-59

When I go to a swap meet and I see original Harley-Davidson boxes, I always have to check 'em out.  If the part number ends in -52, -54, -57 or -58 I get all excited !  Maybe an NOS Sportster part????
I like any original Harley part....especially the type of parts that "wear out" after awhile.  If the part number ends in "P" I think it's a Sprint part (I call it).
I found this one . . . opened the box and had to make an offer on this original NOS Big Twin 4-Speed Kicker Gear.  The price was right - and it went right-in-my-pocket.  A guy can build an entire motorcycle after buying just one particular part that sets the stage - and taints your interest.

Now I'll have to look for a nice transmission case, mainshaft, some gears . . . and build a transmission.  Or just put it in a box until the one in my bike wears out?  Probably a smarter thing to do . . .

Barn Find 53K

Not mine...but most of my bikes looked like this when I got 'em - mostly worse.

Just build all the old ironheads . . .

. . . to look like this.  Every guy needs one.  If it's a big city, or a small little town.  For a quick flick through town, up the hill, down the alley . . . easy parking.  Park it in the garage, in the shed next to the mower, or lean it against the fence (with a blue tarp over it).  No battery.  No Problems. 

Old Bikes

We rode to the drag strip one Saturday, and all these older Harleys rode in right after us.  It was cool, since most times it's a sea of Twin Cams !  That's dad's ol' '65FLH (nearest) running a late model CV carb and Spike timer.  The last few days he's been fabricating a 42mm Mikuni flat slide.  He had it running in the garage, and said, "It's definitely more responsive."  The CV has a flat spot about off-idle that we just can't seem to ditch . . . it runs ok, but ok sometimes ain't good enough, (you know what I mean)

RIMAC Valve Spring Tester


Manufactured by: Rinck McIlwaine Company.  I can test valve springs for pressure at installed spring height, and cam-open position.  The arm can be locked to test spring fade over time.  Tested....it works perfect !  The heavy cast iron base keeps it put when testing springs.  It looks to be made in the 1930s or 40s???  I'll clean it up and paint a sturdy cast gray shop color . . . Vintage tools.  Made in USA.  Restoring vintage engines with vintage equipment. 

Studio Shoot


Some Things Never Change

Ol' Noot's still workin' on bikes in his garage.  Wall to wall sissy bars.  He got me one for my 20" Murray. 

TECH: Intake Valves

I like these valves available from Eastern Motorcycle Parts.  They have nitrite coating which allows you to set-up your valve/guide clearance a bit tighter (especially with cast iron guides).  The valves can be cut and machined to suit your seat size.  Shown below:  I'm using the larger KH Intake Valve, but cutting the head dia. to 1.750 to fit the smaller K Model Intake Seat.
I had the valve head "lip" machined off (uncut valve on the right) to aid in flow between the valve and the head.  Jerry Branch found the best flow with +.120 to +.150 above the intake valves.  The Eastern Part No. 18070-54N(N for Nitrite).  Nitrite coatings are proven to decrease valve "stick" and add to the life of your valve and guide.  Kibblewhite valves are also a good choice. 
After I grind the 45 degree on the valve, I re-adjust our Kwik Way valve grinder to 15 degrees and take that small edge off at the top of the 45 . . . Our engine building friend (I'll just refer as, Radar) told me that little bevel increases port air flow and efficiency "about as good as anything."  Since the air and fuel is coming in - flowing towards the bottom on Intake valves, we don't need that lip messin' up our path.  On Exhaust valves, the 15 is not as critical, but I usually put the 15 on too....I also bevel the outside(top lip) since the air is coming at the top of the valve, to help get that exhaust out of there !
Bottom Valve: The bottom valve just looks better . . . There are few aftermarket products that are ready "right out of the box" . . . but these valves at least may be modified to your liking.  It was easy, everybody would do it. 

Harris


1969 XLCH

Nice pass . . .

It's too cold . . .

 . . . I want to be back in Florida instead. 

Ice Forming This Morning 11/13/18

Last night I got on the roof to get the leaves from the gutters....and they were frozen in there.  Hopefully 45F on Thursday . . .

Long Live Harley-Davidson

Genuine breeds Aftermarket . . . The longest living motorcycle company, and stimulus for millions of dollars of aftermarket products.  The brand will be relevant long after we're all gone.  This 8X10 red, white and blue decal was suitable for framing - however some of corporate's choices, and what direction they're going - are black and white to me. (but, I like the Livewire !)

Park Your Ass . . .

 . .  on some Fiberglass !

Iron XR750

I believe this is a real one???  The top end seems short...