.004 and .007
I installed the shafts in these knuckle flywheels (only after we double-checked the quality of the centers and run-out of each shaft.) Guess what? The centers needed fixing. Some dudes might have just tossed the original H-D shafts, when they didn't really see what the problem was. Others may have just assembled everything and trued it up, not realizing they were off, 'cause their center was damaged. Gotta really check this shit . . . new in the package, or used. Check it.
I installed the shafts (with a new key in one) and put them in the truing stand using the "special long center" I had made to reach the short sprocket shafts. I checked the run-out of the far edge of the outside face of each flywheel. S&S Cycle likes .007 or less, so I always use that as a guideline. One had +020 and the other +010. If you can visualize this: I take them out and put the end of the shaft (down on a lead plate) with the "high side" down on the plate. I strike the flywheel on the top edge, carefully with a non-marring lead hammer. What I'm attempting to do here is make the shaft more perpendicular to the flywheel. Check run-out again in truing stand. You can adjust your run-out in this fashion correctly. If it doesn't move after a couple strikes I quit. It takes time, but now you can assemble the flywheels and true the crank pin - I believe you will have a smoother, stronger and longer lasting rotating assembly.
NOTE: If it still has too much run-out, I remove the shaft, remove the key and gently lap the shaft to the taper a bit (not too much) - then wipe clean, clean with brake kleen, then reassemble. You have to get this in the .007-.010 range for best result. Then try a different shaft if you can't get it, and make sure the nut face(towards the flywheel) is true, an out-of-true face can kink the shaft too.
Shovelhead Exhaust Flange Repair
Carved out the huge broken crater, and destroyed threads - We had it all welded up (Thanks Dustin). Using a fire ring gasket, and an old pipe flange - we refigured where the hole would be best, leveled it out, tilted the drill press table, and drilled and tapped for 5/16-18 USS. I like to use a stud. Mount the exhaust pipes with NO STRESS on the head pipes. They almost stay on and seal with no nut, then you know there's no binding. The pipes are clamped to the frame and brackets, and square and true (no binding) at the heads. Only then, I tighten the head/flange fully.
Support
They were all small once, started out just the same. Some never made it much bigger. Some didn't want to. It was best some did not.
Support the independents:
Parts, Labor, Races, Shows, Paint, Art, Books, Movies . . . even Shirts !
Clapper Restoration
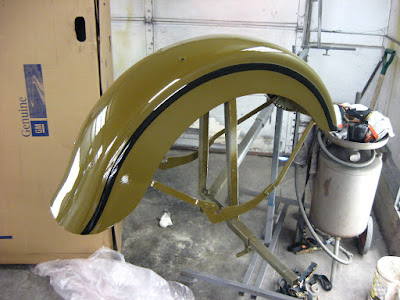
I got the phone call. My original 1954 (date code A4) wishbone frame (and small parts) were painted, done and ready to be picked up ! Pick up paint days are the best ..........
It's been about 2 years since I started restoring this frame. It just takes time to get an original frame done right. Thanks to Jordan Dickinson, Jeff Gelner and Chad Clapper . . . it's back. Solid and straight and right. Thanks bros.
All types of resto projects goin' on at this place, from Jeeps, classic antiques, muscle cars, etc . . check out the Excelsior . . .
This motorcycle previously had an "amateur restoration" . . . and you know what that looks like - It's much better now. Preserving our American heritage with classic, antique motorcycles.
As many of you already know, this type of work (restoring bikes, cars, etc) can be very stressful and drive a guy totally mad - his own ways of stress relief . . .
I don't know why they call him Rattlecan, Chad's paint jobs are some of the best.
A young, local ruffian, Colby inherited this '77 from his grandmother (who bought it new). I feel so old now. I must say, Colby has a spirit and drive to get this thing restored, so we started rippin' it apart. It's very rough - but hey, we're professionals. Hiccup.
It's been about 2 years since I started restoring this frame. It just takes time to get an original frame done right. Thanks to Jordan Dickinson, Jeff Gelner and Chad Clapper . . . it's back. Solid and straight and right. Thanks bros.
All types of resto projects goin' on at this place, from Jeeps, classic antiques, muscle cars, etc . . check out the Excelsior . . .
He finally got it done . . . all apart - restored - full paint and striping - all back together. A beautiful job. Perfect.This motorcycle previously had an "amateur restoration" . . . and you know what that looks like - It's much better now. Preserving our American heritage with classic, antique motorcycles.
As many of you already know, this type of work (restoring bikes, cars, etc) can be very stressful and drive a guy totally mad - his own ways of stress relief . . .
I don't know why they call him Rattlecan, Chad's paint jobs are some of the best.
A young, local ruffian, Colby inherited this '77 from his grandmother (who bought it new). I feel so old now. I must say, Colby has a spirit and drive to get this thing restored, so we started rippin' it apart. It's very rough - but hey, we're professionals. Hiccup.
Don't forget . . .
. . . to put the clutch rod in BEFORE you get the pressure plate on, all the springs, and the cover all sealed up. I did that once, years ago - and I looked down after it was all done and saw the clutch rod there on a shop towel . . . FFFFFUUUUUUUUUCCCCCCCCKKKKKKK !
Shredded Ice
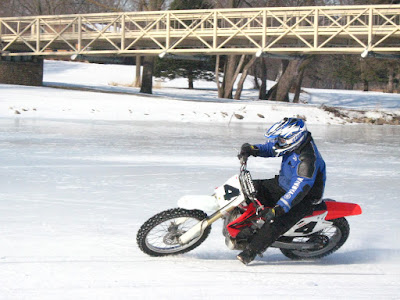
Jeff & Ryan tried out their new "Canadian" ice screws yesterday on the main channel of the Cedar River. 9" of ice, sunshine and 20 degrees - perfect conditions with hard ice.
Fast Eddie (from Cedar River H-D) came out and ran borrowed equipment all day. Here he caught his foot, but saved the day and kept right on chargin' . . . smile on his face.
Bake was hooked. Most of the time he went by so fast, I only caught part of a front or rear wheel . . .
Lil' Schmitty's 2nd time on ice. He looked smooth, never saw him down . . . and a he plowed the track in between heats on his quad - Bonus !
Fastest guy of the day on AMA legal Kold Kutters . . . Brian Schmidtke. I knew which bike was his, 'cause he's got his name on his tires. Chris Carr's ol' No. 4.
Burton tries out Jeff's CR . . . he's diggin' the hook-up !
Ryan Hackleman drove up from Des Moines. Thanks for comin' up dude, and nice talking to you again. Ryan's a crazy ol' cat who's finally mellowing out - ha ha. Yeah right.
TECH: Early Sportster Primary
These are the factory H-D locks, for tightening the sprocket shaft nut and clutch hub. I used an original brass nut-lock under the hub nut. Supposedly designed to help seal from outside oil.
Double-Check your primary chain adjuster bolts. If the bottom one is too long, it will hit the flywheel (since it goes all the way through). I use loc-tite red, and an extra heavy flat washer with lock.
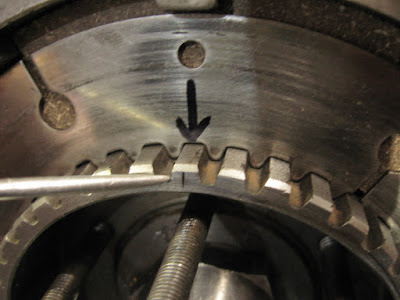
Your clutch will function properly if you line up the small hash on the clutch hub with the big hole in the steel plates. Stamping (beveled side OUT) on the steels. On new Raybestos fibers, I take a flat file and deburr(square up) all the slots of excessive fiber material, so they slide nice on the clutch basket dogs.
Drew's Ride
Here's a pic I found of me and Drew's bike (a couple years before he let me sleep on Dolly's couch).
Last Lap
My buddy Kike has a tricked-out Victory. I've rode a lot of miles with him. It's an all black bagger with 100cu in motor - and it never failed. When we'd be at a stop, the old timers where gawkin' at my panhead or ironhead. The rest were checkin' out his Victory. I saw him pull away from many Harleys - it runs hard, looks trick - and I wouldn't feel stupid riding his bike (like I would a new Indian(yuk). It's too bad the company is closing, 'cause I liked their motorcycles. But, I never bought one myself . . . and that's probably what did it. A lot of dudes didn't buy one. No matter what Arlen Ness or Roland Sands could do . . . they ain't makin' anymore. But that don't mean they weren't any good.
Now Kike will be like me . . . ridin' iron(or aluminum) they don't make anymore ! Hey, she liked it !
Now Kike will be like me . . . ridin' iron(or aluminum) they don't make anymore ! Hey, she liked it !
1978 Eagle River World's Championship
I was at this race (12 yrs old) and got an autographed photo of the Polaris Team for my friend Tony Trainer. I'm a Yamaha fan, and they got blown off the track that day. I wonder if he still has that glossy photo? It's worth money now !
116 YEARS AGO . . .
Did you know the H-D Bar & Shield Logo was patented in 1911? (CORRECTION: May of 1910) From now forward, I'm running some of my more obscure historical facts though Bill so we get it correct. I like to keep it accurate on this blog.
'66 Gear Box
Workin' on my friend Eric's (period crusty ironhead resto)
1. Big Noot got the endplay debacle figured out.
(a head-scratcher deal, you'd never seen before)
2. Ground the counter thrust washer
with special tool, - now it's spec.
3. Replaced a bad gear (we had one, last nice gear)
& measured race, shaft and rollers.
4. Replaced kicker bushing & Seal.
(I turn seal wrong-side out, bevel the edge and turn
it back to prevent cutting it with the shaft)
5. Kicker shaft took .014 shims, all tight...
it helps keep hub teeth engaged when starting.
6. New push-rod end seal
7. Dustin fixed/welded rear motor mount
8. I replaced and sized new shifter shaft bushings
in the case and gear cover. (gear cover bushing drilled
for grease zerk, without hitting the inside of bushing !
9. New sprocket seal (leave screws a bit loose, center it
with your sprocket, then snug up screws.
10. Countershaft bearing installed correctly
PS. Another helpful hint: I always take apart the Pawl Carrier and inspect the springs. I bend 'em around, (sometimes they break) and check to see the springs are worn on one side. If these bust, then it shifts like shit or not at all. I grease them up, nice and slippery. I like the factory springs(if you can find them) and the Eastern springs are ok too. Over & Out.
CP 1038 and/or CP 1035
I like to collect fasteners . . . even better when I buy a part and someone left the original bolt or screw to fill the threads. CP 1038 bolt head designations. Slotted, fillister heads. 1/4-24 threads. All that is H-D fastener glory. Kevin Baas' KH is missing the original gear cover screws - Hey, I got 'em.
Bolts stored in coffee and nut cans - Keeping traditions alive ! I'm back home from the swap, and she asks if I had fun, etc. - and I'm all excited to show her my rusty bolts and my nuts . . . ha ha
Subscribe to:
Posts (Atom)


